What to Expect on Your Final Bonding Veneer Appointment
Getting veneers is an exciting step towards a more confident smile. By the time you reach your final bonding veneer appointment, you’ve already gone through several important stages, like consultations, planning, impressions, and possibly wearing temporary veneers.
Your final bonding appointment is where your new smile comes to life. It’s the day your permanent porcelain veneers are fitted and bonded securely to your teeth.
So, what can you expect during your final bonding veneer appointment? Let’s walk you through what happens during this appointment, how the process works, and what you can do to care for your new veneers afterwards.
Before the Final Bonding Appointment
In most cases, you may have already worn your temporary veneers before your final appointment. The purpose of these veneers is to protect your prepared teeth while your custom porcelain veneers are being created in the dental lab.
During this time, your dentist may ask for your feedback on the shape, colour, or feel of the temporaries. Any adjustments you request, like making them slightly lighter, rounder, or shorter, can be applied to the final veneers for the perfect fit and appearance.
If little to no reshaping of your teeth was needed, you might not have worn temporary veneers at all. By the time you come in for your final veneer bonding appointment, your permanent veneers will be ready, refined to match your preferences, and prepared for fitting and bonding.
Now, here’s what will happen on your final veneer bonding appointment.
What Happens in the Appointment
Step 1: Removing Temporary Veneers (If You Have Them)
Your appointment begins with the careful removal of your temporary veneers. Once they are off, the underlying teeth are cleaned and prepared for the bonding process. This step ensures there’s no leftover cement or debris that could affect how the veneers sit or adhere to your teeth.
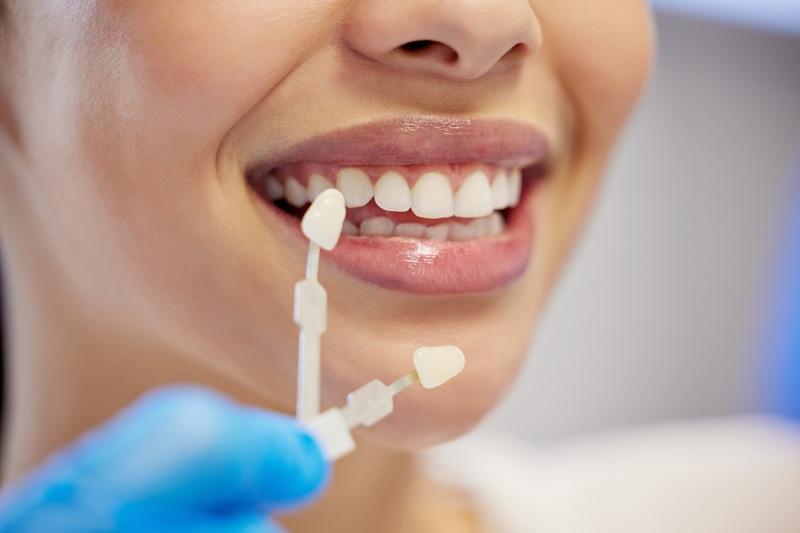
Step 2: Veneer Try-In and Shade Matching
Before anything is permanently bonded, your dentist will place the veneers on your teeth without glue, which is called the try-in stage.
In this stage, you will be able to see what your new smile looks like, and your dentist will check that:
- The colour (shade) matches naturally with your other teeth
- The shape and fit complement your facial features
- Your bite feels comfortable
Only when you’re completely happy with how they look and feel will your dentist proceed to the next step, which is permanently bonding the final veneers. If you’re in doubt about committing to veneers, it’s better to consider some things first before getting them.
Step 3: Keeping the Teeth Completely Dry
In this part, it’s crucial for the teeth to be completely dry during the gluing process to make sure the veneers stay in place. Moisture can weaken the adhesive, so your dentist will use a few different techniques to ensure a dry working area. This can be possible with either of these three options:
- Rubber dam: A thin rubber sheet that isolates the teeth and keeps saliva away.
- Cotton rolls: Placed around the mouth to absorb moisture.
- Gentle retraction: Soft materials may be used to gently move the gums aside, ensuring the area near the gumline stays dry.
This helps the resin cement adhere properly and ensures a long-lasting bond.
Step 4: Bonding the Veneers
Now comes the exciting part, bonding veneers permanently to your teeth. Here’s what will happen in this procedure:
- Tooth preparation: The dentist applies an etching solution, which is mostly made of acid, to slightly roughen the tooth surface. This helps the bonding material stick securely.
- Bonding agent: A thin layer of resin bonding material is placed onto the etched surface.
- Cement application: The dentist applies the resin cement onto the inside of the veneer and positions it precisely onto your tooth.
- Light curing: A bright UV light is used to harden the glue, turning it from liquid to solid in just seconds.
- Cleaning up: Any excess glue is carefully removed to avoid gum irritation.
Once all veneers are bonded, the dentist will gently polish and smooth the edges for a perfect, natural finish.
Step 5: Polishing and Bite Check
After the veneers are bonded, your dentist will polish them to give a natural shine and check your bite alignment. This ensures your veneers are comfortable and that no edges are too high or uneven.
Even a small imbalance in your bite can cause unnecessary pressure, so this step helps protect your veneers long-term.
Step 6: Immediate Aftercare and Recovery
Once your permanent veneers are bonded, it’s best not to eat or drink hot beverages to avoid accidentally biting your cheek or tongue. Be mindful of what you bite into to ensure your veneers stay securely in place. Remember that veneers are made from durable porcelain, but they are not indestructible.
Avoid these habits after your final veneer bonding:
- Biting on ice cubes or crab shells
- Using your teeth to open packaging
- Nail-biting or chewing on pens
- Very hard foods like bones or uncut apples
Safe foods include:
- Nuts, raw carrots, and seeded bread (as long as you chew gently)
- Normal everyday foods eaten with care
Ongoing Care and Maintenance
Veneers also need regular dental care to keep them looking their best. As mentioned, veneers are made from durable porcelain, but that does not mean they will not break. Here are some tips to ensure they are cared for while making sure your oral health is at its best:
- Brush and floss daily using a soft-bristled toothbrush and non-abrasive toothpaste.
- Attend regular check-ups and cleans at your dental clinic to keep your gums healthy and ensure your veneers stay secure.
- If you grind your teeth at night, your dentist may recommend a night guard to protect your veneers while you sleep.
Keeping your mouth clean helps prevent gum inflammation and extends the lifespan of your veneers.
Welcoming Your New Smile with Veneers
Your final bonding veneer appointment marks the end of your smile transformation and the start of maintaining it for years to come. With proper care and attention, your transformed smile will last with you for a while.
If you’re considering getting veneers in Blackburn, VIC, Whitehorse Dental can help you understand better and assess whether you’re a good candidate for it.
Schedule a visit with us by booking online or calling us at (03) 9111 3402
Frequently Asked Questions
1. What happens during the final veneer bonding appointment?
Your dentist removes any temporary veneers, checks the colour and fit of your permanent veneers, and bonds them to your teeth using a special resin cement and curing light. The veneers are then polished, and your bite is checked for comfort.
2. Do I need to wear temporary veneers before my final appointment?
In many cases, yes. Temporary veneers protect your teeth while your custom porcelain veneers are being made. They also let you preview your new smile and provide feedback on shape, shade, or size.
3. How long does the final bonding appointment take?
It usually takes one to two hours, depending on how many veneers are being placed and how much fine-tuning is needed.
4. Will the veneer bonding process hurt?
No. Your dentist will use a local anaesthetic to keep you comfortable. You may feel mild pressure while the veneers are being placed, but not pain.
5. Why do my teeth need to be kept dry during bonding?
Keeping the teeth dry ensures the adhesive bonds properly. Moisture can weaken the cement, so dentists use rubber dams, cotton rolls, or gentle gum retraction to keep the area dry.
6. What should I avoid after my veneers are bonded?
Avoid biting on very hard foods like ice, crab shells, or uncut apples. Also, skip nail-biting or using your teeth to open packaging. These habits can damage the porcelain surface.
7. How long after veneer bonding can I eat or drink?
Wait until the numbness from the anaesthetic wears off before eating. Afterwards, you can return to normal foods. Just chew carefully and avoid biting directly on very hard items.
8. How do I care for my veneers after the appointment?
Brush and floss daily using a soft toothbrush and gentle toothpaste. Visit your dentist for regular cleans and check-ups. If you grind your teeth, ask about a night guard to prevent wear.
9. How long do veneers last?
With proper care and maintenance, porcelain veneers can last 10–15 years or more. Regular dental visits and avoiding damaging habits will help extend their lifespan.
10. Do veneers need special maintenance?
Not beyond normal oral care, but consistent hygiene and professional cleaning are vital. Keeping your gums healthy helps your veneers stay secure and looking their best.